Measurement and test equipment verification is used for equipment which cannot be calibrated. This kind of ‘fixed’ equipment will usually be disposed of and replaced if it is found not to be accurate.
Accurate measurement and testing equipment is a necessary tool for inspection firms, factories, and testing labs to assure accurate results from product inspections & tests.

What does the verification process look like?
Here is an extract from our internal work instruction (WI) for the verification of measurement tapes, as an example for you.
Step 1 – Preparation 制备
Clean the Measuring Tape’s measuring surfaces and the gauge blocks to be used with a cloth. 用布清洁卷尺的测量表面和要使用的量块。Step 2 – Visual inspection of the tape 目视检查卷尺
Slide out 20 cm of the measuring tape. Inspect the body of the tape measure, the tape itself, and the tabbed metal clip on the end of the tape for damage, visibility of scale and marks, and looseness. 滑出 20cm 的卷尺。 检查卷尺的主体,胶带本身以及胶带末端带标签的金属夹是否有损坏。刻 度和标记是否清晰可见。
Acceptable Limit: Should have smooth movement along its whole length and markings should be clearly visible 可接受的极限:应沿整个长度平稳移动,标记应清晰可见Step 3 – Scale measurement 比例测量
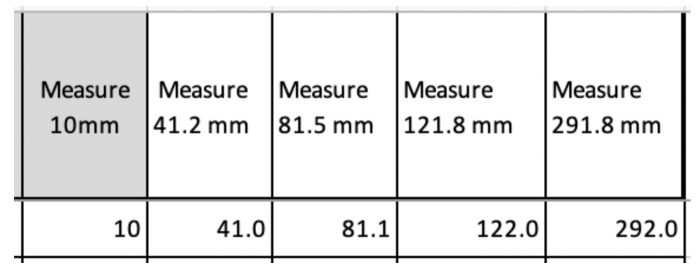
Using gage blocks, measure and record 5 different lengths (10mm, 41.2mm, 81.5mm, 121.8mm, 291.8mm). Join multiple gauge blocks for checking longer measurements. 使用量块,测量并记录 5 种不同的长度。 加入多个量块用于检查更长的测量值。 Acceptable Limit: +/- 1mm 可接受的极限:+/- 1mm
Please note, this is not the full WI for this verification activity.
Once the equipment has been verified a sticker will be added to show that it’s verified and when the next check should take place:

How to record verification results?
Following verification, the records are kept with the following information:
Type of equipment

Verification method

Results


